Measurement of Residual Stress Using X-Ray Diffraction (XRD)
05 Jan 2021
What is Residual Stress and How can Intertek Help You?
Residual stresses (RS) are internal stresses present in the material after external loading forces have been removed. Manufacturing processes such as machining, casting, alloying, quenching, cutting and tooling can all contribute to a change in residual stress. Residual stress measurements are particularly useful for quality control purposes. Determining the distribution of residual stress is important because high residual stress can lead to premature catastrophic failure of a component. To help our customers combat these issues, the XRD unit can:
- Help to analyse failures caused by fatigue or stress corrosion cracking (SCC)
- Estimate fatigue life and stress concentration
- Effects of heat treatment and surface treatments
- Provide evidence peening operations are having the desired result
- Validate manufacturing processes
- Gain an understanding of wire electrode discharge machining (EDM)
- Study surface distortion
- Process modelling and optimisation
- Design improvements
- Identify RS at the surface and subsurface
What can Intertek do for you?
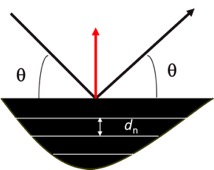
X-ray diffraction is based on Bragg's law and with our range of X-ray tubes can accommodate a range of metals and alloys such as:
- Titanium alloys e.g for aerospace / medical applications
- Nickel alloys
- Aluminium alloys
- Steel
Components such as gear teeth with very high compressive stress levels in a high stress, cyclic application, at levels around -1000 mPa can be measured to determine fatigue life / component life.

Using the sin2y technique, we measure the d-spacing (Bragg's law) and use this as an atomic strain gauge. Material elastic constants are then used to calculate the residual stress without the need for a stress-free standard.
The benefits of choosing to measure residual stress via XRD include:
- Material removal by electro-polishing does not induce or change the stress state
- Hydro-fluoric emersion etching facility for titanium material removal
- Non-destructive surface measurements can be evaluated without the need to section samples from large components
- Lower cost compared with Neutron and Synchrotron methods
- Complementary tests such as optical microscopy, scanning electron microscopy (SEM), surface measurement (Alicona) and hardness testing can be used in conjunction with XRD to provide a complete picture
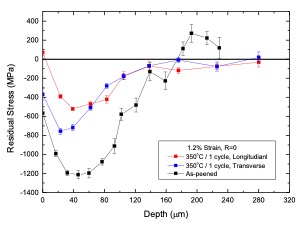
Data processing software using the Moore-Evans correction for removed layers model allows residual stress to be quantified at different depth, revealing a depth profile with varying stress field:

Residual stress measurements are UKAS accredited and performed in compliance with the NPL Good Practice Guidelines. Whether you are in the transportation, medical, military, power generation or O&G industry, ultimately understanding residual stress can help to make high-integrity products safer and more reliable and provide vital information about the performance and lifecycle management of your product.
Learn more about X-ray Diffraction techniques and the range of testing we offer or send us an email.

Jake Greensmith,
X-Ray Diffraction Technician
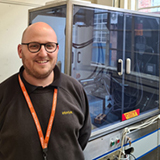
Jake is a technician based in Intertek Materials Testing Laboratory in Derby, UK. He has more than 3 years' experience measuring residual stress on a variety of materials and components. He also has a wealth of knowledge in metallurgical preparation and assessment of metallic specimens. Jake has been involved with weld flash assessment and incremental polishing of high-integrity components.